Ever looked at your hydrangea and thought, “I wish I had more of these without spending a fortune”? Good news: you can.
The real trick is that propagating hydrangeas is actually pretty simple once you know the right technique. No need to keep buying new plants from the nursery.
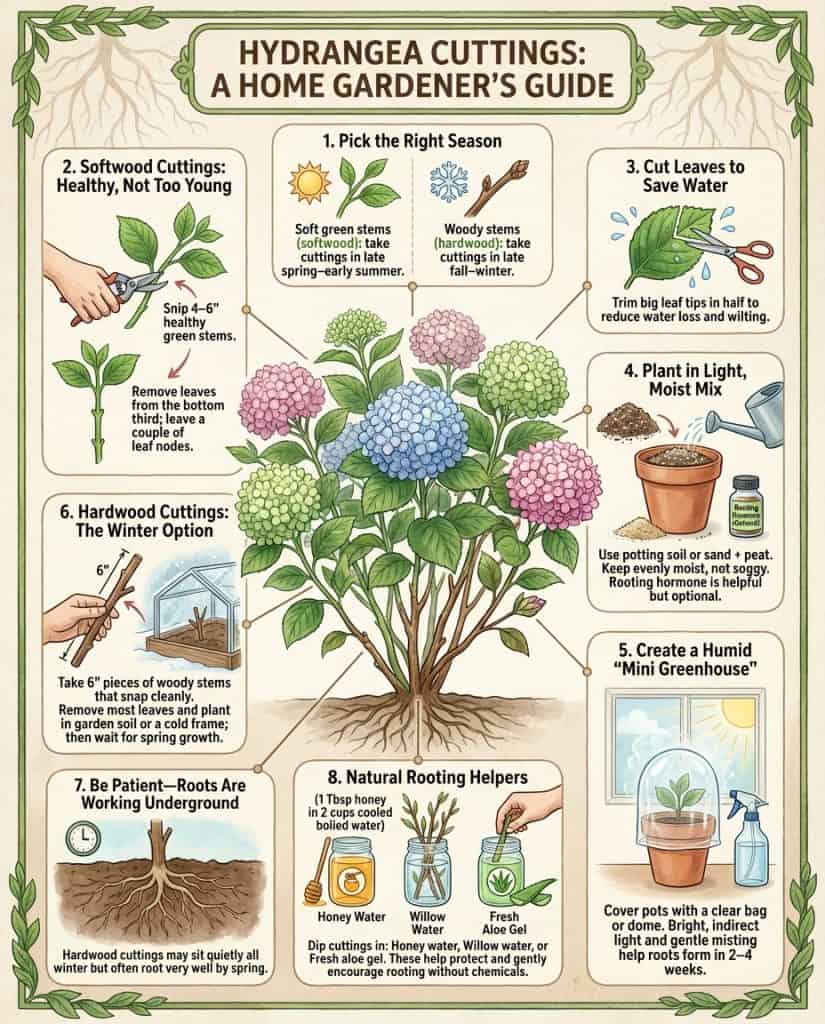
Perfect Timing: When to Snip for Success
Timing is crucial for hydrangea propagation. Taking cuttings at the wrong time can reduce your success rates by nearly 70%. That explains why some attempts don’t work out.
What matters most isn’t just the season. It’s matching your cutting type to when you take them:
• Softwood cuttings: May to July (late spring to early summer)
• Hardwood cuttings: October to February (late fall to mid-winter)
Your climate zone matters here, too. Think of your hydrangea as needing the right conditions to do its best work.
Softwood vs. Hardwood: Choosing Your Method
These two propagation methods work differently, so it helps to understand both.
Softwood Cuttings: These young, flexible green stems root quickly but need more attention to conditions. They’re faster but a bit fussier.
Hardwood Cuttings: These woody, mature stems take longer to root, but they’re more reliable. They’re slower to start but easier to manage.
A common mistake is trying only one method and giving up if it doesn’t work. Experienced gardeners switch between methods depending on the season.
Softwood Success: Your 4-Step Action Plan
Here’s how to make softwood cuttings work:
1. Select a healthy stem: Choose stems that are 4-6 inches long and look healthy and disease-free. You want stems that aren’t too young or too old.
2. Prep the cutting: Remove leaves from the bottom third of the stem, leaving just a few leaf nodes. Trimming the leaf tips can reduce water loss by up to 30%.
3. Plant it: Use standard potting soil or a sand/peat mix. You can dip in rooting hormone if you want to speed things up, but it’s optional.
4. Create humidity: Cover with a clear plastic bag or dome. This keeps humidity high, which helps your cuttings root faster.

Please keep them in bright, indirect light and mist regularly. Within 2-4 weeks, you should see new roots forming.
Hardwood Cuttings: The Winter Method
Even when it’s cold outside, you can still propagate with hardwood cuttings.
Here’s how:
1. Find mature stems: Look for this year’s growth that has hardened and become woody. The right stem should snap cleanly when bent.
2. Prepare the cutting: Cut 6-inch sections, remove most leaves, and optionally dip in rooting hormone.
3. Plant and wait: These can go directly in garden soil or a cold frame. Unlike softwood cuttings, they’re not as sensitive to conditions.
The difference between new and experienced gardeners is often just a matter of patience. Hardwood cuttings may not show much until spring, but their success rate can exceed 80% when done right.
The Rooting Hormone Debate: Natural Alternatives That Work
You don’t need fancy rooting hormones to succeed. While they can speed things up a bit, they’re not essential.
My dad sticks cuttings straight into the soil with no added nutrients, and they grow just fine. Meanwhile, my first attempts didn’t go so well.
Here are some DIY alternatives that many gardeners use:
• Honey Solution: Mix 1 tablespoon of honey in 2 cups of boiled (then cooled) water. The natural antibacterial properties help prevent rot while encouraging root growth.
• Willow Water: Soak fresh willow cuttings overnight in warm water. Willows contain natural rooting hormones that can help your hydrangeas.
• Aloe Vera Gel: Fresh aloe gel works well as a rooting aid . Dip cuttings in the gel before planting.
Want to experiment? Try propagating identical cuttings. Some with hormone, some without, and see if there’s much difference.
Aftercare: Keeping Your Baby Hydrangeas Healthy
Once your cutting has rooted, take it slow before moving it outdoors.
Follow these aftercare steps:
• Gradually introduce cuttings to outdoor conditions. Sudden changes can shock them
• Transplant only when they’ve reached 2-4 inches in size
• Avoid soggy conditions. Moisture is good, but too much water causes problems
• Begin fertilizing only after plants are established (typically 4-6 weeks after rooting)
The best part about successful propagation is the care you provide in those first few weeks. That’s what makes the real difference.
Your Hydrangea Multiplication Journey Starts Now
There you have it. Everything you need to turn one hydrangea into several. Whether you choose the faster softwood method or the slower hardwood approach, you now have the tools to succeed.
Remember that every experienced gardener started somewhere, and propagation failures happen to everyone. The plants that do well will make you forget about the ones that didn’t.
Now go ahead and give it a try. Your future self (and wallet) will thank you.