Forget everything you thought you knew about growing potatoes. That fancy garden bed? The endless digging? The backbreaking harvest? Not anymore.
I was shocked to discover that those ordinary milk crates collecting dust in your garage might just be the secret weapon for growing the most spectacular potato harvest of your life, even if you only have a tiny balcony to work with!

Why This Potato Tower Will Change Your Gardening Game Forever
Let’s be honest: traditional potato farming is labor-intensive. You dig trenches, hill endlessly, and then destroy your back excavating them at harvest time. But what if I told you milk crates could transform this entire experience?
The secret most plant experts won’t tell you is that potatoes absolutely THRIVE in vertical spaces when done right. A properly built milk crate tower can yield up to 25 pounds of potatoes in just 4 square feet of space. That’s up to 3 times the yield of traditional garden rows!
Think of your potato tower like a high-rise apartment building for spuds. Each level provides prime potato real estate with perfect drainage (something potatoes desperately need) and easy access for the ultimate no-dig harvest.

Gather Your Tower Power Tools (What You’ll Need)
Before diving in, let’s gather our supplies. Nothing fancy required – promise!
- 3-5 sturdy milk crates (more for taller towers)
- Landscape fabric or burlap (the potato tower’s unsung hero)
- Quality potting soil mixed with compost
- Straw or hay for layering
- Seed potatoes (certified disease-free for best results)
- Watering can or hose
- Small garden trowel
Building Your Potato Skyscraper (In 5 Easy Steps)
Ready to construct a potato paradise? Here’s how to transform those ordinary crates into a food-producing powerhouse:
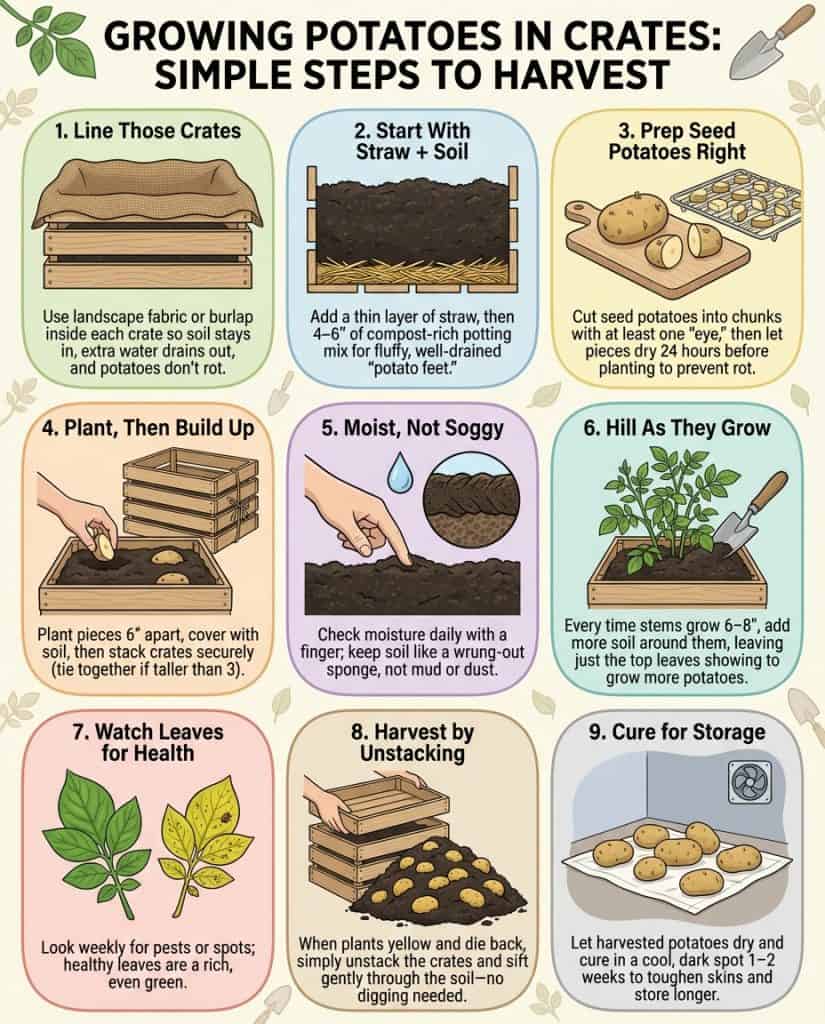
Step 1: Prep Your Crates
Line each milk crate with landscape fabric or burlap, leaving a few inches hanging over the edges. This crucial step retains soil while allowing excess water to escape. Think of it as creating the perfect potato spa environment; moist but never soggy.
Step 2: Create Your Foundation
In the bottom crate, add a 2-inch layer of straw or hay, followed by 4-6 inches of soil mix. This combination creates the drainage magic that makes potato towers work so brilliantly. Potatoes hate wet feet even more than humans hate wet socks!

Step 3: Plant Those Potato Babies
Cut seed potatoes into 2-inch chunks, ensuring each piece has at least one “eye” (those little sprouts). Let them dry for 24 hours to prevent rotting: a crucial step that most people often skip. Then, place them in the soil about 6 inches apart and cover with an additional 2-3 inches of soil.
Step 4: Stack Your Tower
Once planted, carefully stack your prepared crates, making sure they’re stable and aligned. If you’re going to stack taller than 3 crates, consider securing them together with zip ties or garden twine for added stability.
Step 5: Maintain Potato Paradise
Water thoroughly but not excessively. Keep soil moist like a wrung-out sponge. As plants grow to 6-8 inches tall, add more soil around the stems, leaving only the top few inches exposed. This “hilling” technique is how you’ll trick each plant into producing dramatically more potatoes!
Your Potato Tower Care Calendar
Growing gorgeous potatoes isn’t “set it and forget it,” but it’s close! Here’s your simple maintenance schedule:
- Daily: Quick check for moisture (stick your finger 2 inches into the soil)
- Weekly: Add soil to cover growing stems (this creates more potato-producing zones!)
- Monthly: Inspect for pests or disease – healthy potato plants have vibrant green leaves without spots
- Harvest time: When plants yellow and die back (typically 10-12 weeks after planting), it’s time to reap your rewards!
The Mind-Blowing Harvest Method That Changes Everything
The most miraculous part? Harvest day. Instead of digging until your back gives out, simply dismantle your tower one crate at a time! The potatoes literally reveal themselves to you as you work your way down, like opening presents on Christmas morning.

Start from the top crate and gently sift through with your hands to find your treasures. The average milk crate tower can yield 15-25 pounds of potatoes, depending on variety and care. That’s enough to keep a family of four in homegrown spuds for weeks!
Why Your Future Self Will Thank You For Building This Tower
Beyond the impressive harvest, your milk crate tower offers benefits traditional gardens can’t touch:
- Space-saving miracle – perfect for balconies, patios, or tiny yards
- Superior drainage prevents the rot that plagues in-ground potatoes
- Easier pest management – elevated growing means fewer critters
- No digging required – your back will write you a thank-you note
- Reusable system – clean your crates and repeat next season!
The difference between amateur and pro plant parents is simply knowing these space-maximizing tricks. While your neighbors struggle with traditional garden rows, you’ll be harvesting pounds of potatoes from a corner of your patio!
From Tower to Table: Enjoying Your Potato Bounty
Once harvested, let your potatoes cure in a cool, dark place for 1-2 weeks. This simple step toughens their skins and extends storage life by up to 6 months. Your homegrown potatoes will have a flavor complexity and nutrient density that put grocery-store spuds to shame.
Ready to transform your tiny space into a potato-producing powerhouse? Grab those milk crates and get building! Your future self – with dirty hands and a basket full of homegrown potatoes – will be so glad you did.