Forget everything you know about traditional hedging. A game-changing technique has been hiding in plain sight for centuries and is about to transform how you think about garden boundaries forever.
Meet the dead hedge, the most brilliant “failure” in gardening history. I know what you’re thinking: “Dead? That sounds awful!” But here’s the shocking truth that will flip your gardening world upside down.
This isn’t about death at all. It’s about creating the most vibrant, thriving ecosystem your garden has ever seen, using nothing but the “waste” you’d normally throw away.

The Secret Most Garden Centers Won’t Tell You
While you’ve been spending hundreds on fancy fencing and struggling to keep living hedges alive, European gardeners have quietly built these maintenance-free marvels for over 1,000 years.
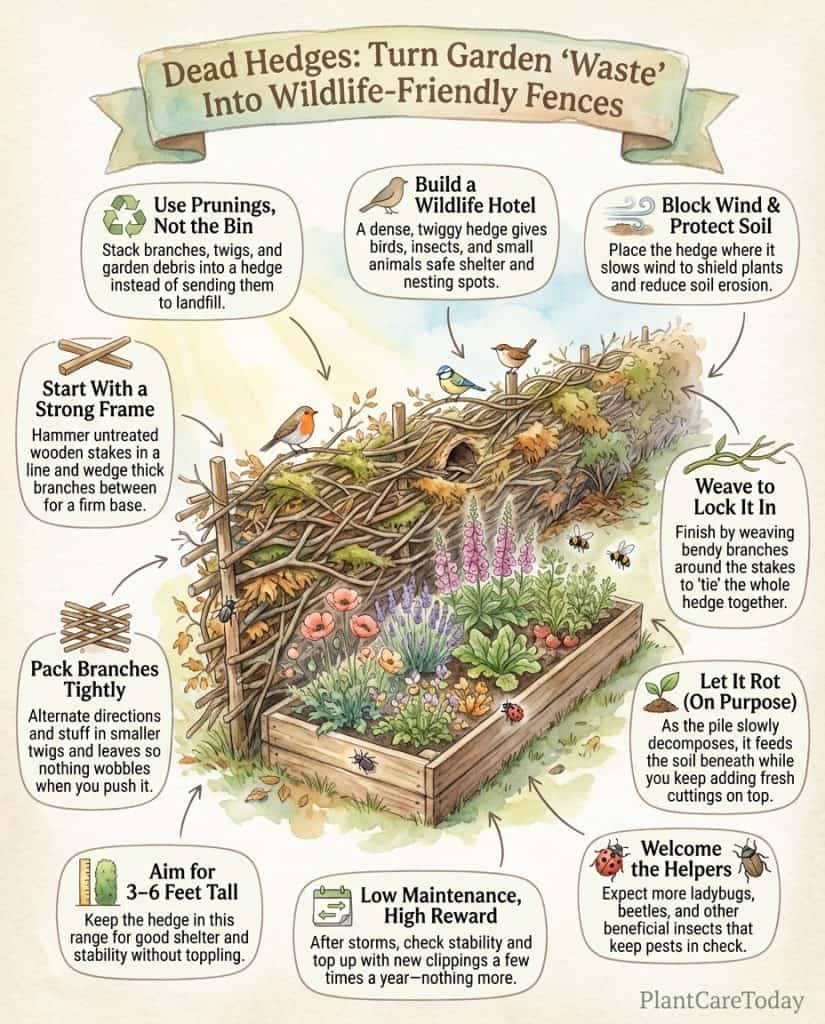
A dead hedge is essentially nature’s apartment complex, a carefully constructed wall made entirely from branches, twigs, and garden debris that becomes a bustling wildlife sanctuary. Think of it as a five-star hotel for birds, but built entirely from your pruning leftovers.
Here’s what blew my mind: Dead hedges can increase garden biodiversity by up to 300% within just one growing season. Your “dead” creation literally brings your garden to life.
Why Your Garden is Desperate for This Ancient Hack
The benefits of dead hedges read like a gardener’s wish list. They’re working overtime even when you’re sleeping, and honestly, I wish I’d discovered this miracle solution years ago.
Wildlife magnet: Birds, beneficial insects, and small mammals treat these structures like luxury condos. You’ll be amazed at the sudden explosion of life in your garden.

Zero-waste hero: Instead of sending pruned branches to the landfill, you’re creating something spectacular. It’s like turning trash into treasure, but better.
Natural windbreak: These structures protect your delicate plants from harsh weather while preventing soil erosion. Think of them as your garden’s personal bodyguard.
Aesthetic game-changer: That rustic, cottage-garden look that costs thousands to achieve professionally? You can create it for free with materials already in your yard.
The secret most plant experts won’t tell you is this: Dead hedges actually improve over time. As materials slowly decompose, they enrich your soil while new additions keep the structure strong and functional.
What You’ll Need (Spoiler: It’s Probably Free)
The beauty of dead hedge construction lies in its simplicity. You don’t need expensive materials or fancy tools. Just a smart selection of what nature provides.
Primary materials: Branches and twigs from hardwood trees like oak, beech, or ash work best because they decompose slowly. These become your hedge’s backbone.
Support structure: Sturdy stakes or wooden posts every 1-2 feet. Pro tip: Use untreated wood only – chemicals have no place in this wildlife paradise.
Filler materials: Smaller twigs, leaves, and general garden debris fill gaps and add bulk. This is where your creativity shines.

Here’s a revelation that shocked me: The “uglier” the materials, the better the results. Those gnarly, twisted branches you thought were useless? They’re actually the stars of your dead hedge show.
Your Step-by-Step Blueprint to Success
Building a dead hedge feels like magic. You’re literally creating something from nothing, and watching nature take over is absolutely spectacular.
Location selection: Choose your spot strategically. Consider wind direction, sunlight, and where you need privacy or wildlife habitat most. The ground should be relatively level for stability.
Ground preparation: Clear debris and level if necessary. Mark your hedge outline with string – this prevents wonky construction that you’ll regret later.
Foundation layer: Drive your support stakes deep into the ground, then lay thick branches horizontally between them. This base layer determines everything, so make it rock-solid.
Layer building: Add materials in alternating directions for maximum stability. Pack everything tightly; loose construction can lead to collapse.
Height: Most dead hedges perform best between 3 and 6 feet tall. Any higher and you risk instability; any lower and you lose impact.
Final securing: Weave flexible branches around stakes to lock everything in place. This step separates amateur attempts from professional-quality results.
The Mistakes That Ruin Everything
I’ve seen beautiful dead hedges destroyed by simple oversights. Don’t let these rookie errors sabotage your success.
Never use treated wood. Those chemicals will poison the wildlife you’re trying to attract. Skip the shortcuts here.
Don’t neglect the foundation. A weak base indicates eventual collapse, typically during the first major storm.
Build it right the first time. Avoid loose packing. Materials should be snug enough that nothing shifts when you apply pressure to the structure.
The Transformation You Can Expect
Here’s what absolutely amazed me about dead hedges: they improve with age like fine wine. As materials slowly decompose, they create rich soil while new additions keep the structure strong.

Within months, you’ll notice increased bird activity. Within a year, beneficial insects will have established thriving colonies. Your garden’s entire ecosystem will shift toward vibrant, natural balance.
The maintenance requirements are laughably minimal. Occasionally, add fresh materials from your garden pruning, and check stability after storms. That’s literally it.
Your neighbors will start asking questions. Your garden will become the neighborhood’s wildlife success story. And you’ll have the satisfaction of creating something beautiful from materials you would have thrown away.
The difference between amateur and pro plant parents is simply this: recognizing that “waste” materials can become your garden’s greatest asset . Dead hedges prove that sometimes the most sustainable solutions are also the most spectacular.