I was shocked to discover that the largest cauliflower I’ve ever grown wasn’t in my expansive garden bed. It was thriving in a simple container on my patio.
The secret most plant experts won’t tell you is that cauliflower performs better in pots when you know the right techniques.
Here’s a mind-blowing fact: container-grown cauliflower can produce heads 30% larger than ground-planted varieties when grown correctly.
Why? Because you have complete control over every single variable that affects growth.
Think of growing cauliflower like raising a champion athlete. Just as an elite trainer controls every aspect of an athlete’s environment: nutrition, training conditions, and recovery.
You’re about to become the elite trainer for your cauliflower. The results will be spectacular.

The Game-Changer: Creating Perfect Growing Conditions
Forget what you’ve heard about cauliflower being finicky. The truth is, cauliflower is like a precision instrument. It just needs the right environment to perform miracles.
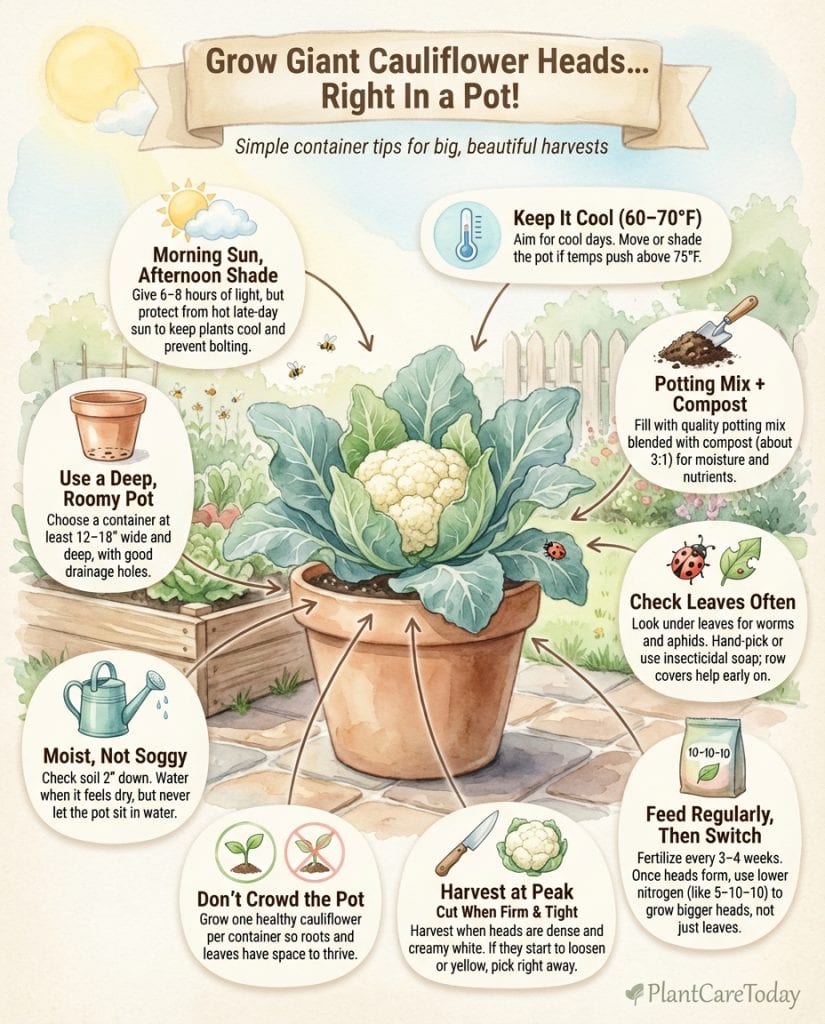
Your cauliflower craves cool temperatures between 60-70°F (15-21°C). Think of it as a winter athlete competing in summer heat; stress leads to poor performance.
When temperatures soar above 75°F, your cauliflower will “bolt,” producing loose, bitter heads that look more like tiny trees than the dense, creamy spheres you’re after.
Here’s the breakthrough most gardeners miss: morning sun with afternoon shade creates the perfect temperature buffer.
Position your container where it receives 6-8 hours of light but avoids the afternoon heat. (Trust me, I learned this the hard way after watching three promising heads turn into disappointments.)
The Foundation: Choosing Your Container Arsenal
Most people make this critical mistake with their cauliflower containers. They go too small. Your pot should be at least 12-18 inches deep and wide. Think of it like choosing shoes for a marathon runner; cramped roots produce stunted vegetables.
The miracle ingredient for your soil mix? High-quality potting mix enriched with compost. I add a 3:1 ratio of premium potting soil to well-aged compost.

This creates what I call the “growth accelerator,” perfect drainage with moisture retention that keeps roots happy and productive.
- Drainage holes are non-negotiable. Waterlogged roots spell disaster
- Clay or ceramic pots provide better temperature stability than plastic
- Add a layer of gravel at the bottom for superior drainage
Variety Selection: The Champions of Container Growing
Your variety choice can make or break your giant cauliflower dreams. I’ve tested dozens, and these container champions consistently deliver show-stopping results:
‘Snowball Y Improved’ produces dense, 6-8 inch heads that are absolutely stunning. ‘Amazing’ lives up to its name with compact plants that don’t sacrifice head size.
For something truly spectacular, try ‘Graffiti.’ The purple heads are conversation starters that taste as incredible as they look.
The Planting Revolution: Seeds vs. Transplants
Here’s a revelation that transformed my cauliflower success: Transplants give you a 3-week head start and much more predictable results. Seeds are cheaper, but transplants are your insurance policy for monster heads.
When planting transplants, dig the hole slightly deeper than the root ball to encourage strong root development.
Water immediately with a diluted fertilizer solution to eliminate transplant shock. It’s like giving your cauliflower a welcome drink after a stressful move.
The Feeding Formula: Nutrition for Giants
The difference between amateur and pro plant parents is recognizing that consistent nutrition yields consistent results.
Your cauliflower is like a growing teenager. It needs regular, balanced meals to reach its full potential.
Feed every 3-4 weeks with a balanced 10-10-10 fertilizer, but here’s the secret weapon: switch to a lower-nitrogen formula (like 5-10-10) once heads begin forming. Too much nitrogen at this stage creates all leaves and no head; definitely not what we’re after.
Water consistently, but never let your cauliflower sit in soggy soil. I check daily by sticking my finger 2 inches into the soil. Dry? Time to water. Still moist? Wait another day.

Defending Your Investment: Pest and Disease Management
Your thriving cauliflower is like a five-star restaurant for garden pests. Cabbage worms, aphids, and slugs will try to crash your party, but you’ve got this covered.
Check your plants every morning. It’s like doing a health inspection. Remove pests by hand (yes, it’s gross but effective), or spray with insecticidal soap for heavy infestations. Row covers during the most vulnerable early growth period are your secret weapon against flying pests.
The Victory Lap: Harvesting Your Giants
The most thrilling moment in container cauliflower growing is harvest time. Your heads are ready when they’re firm, compact, and creamy white, usually 70-100 days after transplanting.
Cut with a sharp knife, leaving several outer leaves attached for protection. If you notice the heads starting to separate or yellow, harvest immediately. When gently tapped, a perfect cauliflower head should feel heavy for its size and make a satisfying “thunk” sound.
Avoiding the Heartbreak: Common Mistakes
I’ve made every mistake possible, so you don’t have to. The biggest failure points are inconsistent watering, wrong container size, and poor timing. Starting too late in spring means your cauliflower hits maturity during hot weather, recipe for disaster.
Don’t crowd multiple plants in one container, thinking you’ll get more yield. One strong plant will consistently outperform two struggling ones competing for resources.

Your cauliflower is trying to tell you something important through its leaves. Yellowing means overwatering or nutrient deficiency. Purple tinges indicate cold stress. Learn to read these signals and adjust accordingly.
With these proven techniques, you’re not just growing cauliflower. You’re cultivating bragging rights. That first massive, perfect head emerging from your container will make every neighbor stop and ask for your secrets. And now you have them.